Showing posts with label Big Shot. Show all posts

Monday, January 18, 2010

Fabric Flower Purse Charms

At Leadership, a top Demonstrator showed us these awesome fabric flowers that she used to create purse charms. I absolutely could not wait to get home & try them! When I got home, I realized that I didn't have the correct dies to create them. I was bummed - especially since I had gone fabric shopping & bought the supplies to create the flowers! I placed an order! ;o)

My order arrived today and guess what I did?!?


These are just three of the 13 I made. Well, I haven't really made 13....I've done all but add the ribbons to the remaining 10. The others are made from the same fabric designs so they look very similar to these. The only difference is that the flower layers are different since the Big Shot die (Flower Folds) cuts out four different sizes of flowers at once.
I love the color combination of blues and browns! I do really like this flower but I can't decide if it's my favorite or not.....I'm leaning toward, "Yes!"

This one is really cute and I wasn't sure how the designs would look together - even though they were bundled together when I bought the fabric.
This one is one of my favorite design combinations. I definitely wanted to use a black/white combination so that it would coordinate with more of my bags and purses.
This is the blue/brown flower.

This is the multi-color flower.

This is the black/white flower. As you can tell, they are various thicknesses. I'm not exactly sure why this is, maybe because I held the iron on that area longer? No matter what the reason, I think I like it.


With the three previous pictures, you can get a better look at the fabric designs I used.
Now, I have to tell you that these flowers may be a little "involved" than I was thinking they would be. I used a "fusible" batting at first but either my iron is just too old to do the job (it is over 20 years old!) or it didn't get hot enough (again, it is over 20!). When that didn't work very well, I ran to the local craft store and bought a batting spray (read: batting adhesive) along with more batting to complete the job. The spray didn't work as well as I expected it to work either. I ironed all the fusible batting fabric designs (I had only tried one design earlier) to see if that would help. That does make the batting more rigid and that looks really good but it doesn't really stick to the fabric. :o(
The only thing I can think of to do next is to sew around the petals with a sewing machine but I'm not a seamstress and I can't even begin to think of doing that. Maybe a different adhesive? What do you think? Anyone have any suggestions on an adhesive to use that won't "gum up" my brand new die?

Saturday, January 16, 2010

Big Shot Fabric Flowers

One of the projects I learned about at Leadership was these really cute fabric flowers. I've seen some other fabric flowers & we were even shown a different type at Convention last July but these are totally different. I loved the other ones I've seen but don't have the correct die to create those.....until Monday. ;o)

When I got home, I couldn't wait to go shopping for fabric to make these flowers! I bought lots of fabric, rushed home to make the flowers and found that I don't own the die that was used at Leadership! :o( I was bummed but my "punch puppy" card fiasco taught me to get out of the "tunnel" and look for solutions right away! And so I did!

This is what the finished product looks like.


I think it looks a lot like a Posey and it's cute-as-can-be in real life! I used the ugliest fabric I bought for this flower. Yes, I thought it was an ugly design but bought it anyway. Why? Because I thought it would end up making the prettiest flowers.....and so far, I'm right! lol

Let me tell you how I made them.....I used my Circles die and cut out 8 layers of fabric (IMPORTANT side note here - you can cut out 8 layers of fabric when you're using a die that does NOT have score lines but only 3 layers if it does). Also, be sure you use fabric that will melt such as Polyester or nylon. Basically, if it's flammable it's good for these flowers!

See, I told you the fabric design was ugly!
Here are the circles after they've been cut out - I think they look much better here!

I forgot to take a picture of the circles after they were layered onto each other so you'll have to see how cute it looks when you create your flowers. ;o)
Next step is to "tack" the layers together. I did this by sewing the pin back on at the same time so I didn't have to do another step. Some call this lazy, I call this working more productively! LOL!
After you tack the layers together, put a pin back on your flower (if you didn't follow my "working more productively" lead).
Once you have a pin back on your flower, you'll want to put it on a clipboard. I put a "bulldog clip" on the end of a Popsicle stick then slid my flower on it & let the flower slide to the clip. I then put the other end of the Popsicle stick under the clip of a small clipboard. This is to 1) hold the flower still & 2) hold the flower with something other than my fingers!
At this point, you'll want to heat up your heat gun. Once it's sufficiently heated, start from the center of your flower, work toward the outside and "melt" the fabric so that it starts curling up.
After you've melted the front of your flower to your liking, flip it over (holding the Popsicle stick!) and "melt" the back a bit so that it will support itself.
Once you've done this, set it aside so that the metal from the pin can cool off......DON'T touch it before it's totally cooled off! ;o)
So, what do you think? If you make some flowers yourself, be sure to either send me a picture of yours or post a link to it (if you have a blog & add it as an entry on yours)! I would love to hear what you think of my "Posey". I'll be working on the other flowers after I receive my other dies so check back to see those.....I can't wait to get started!!

Tuesday, September 15, 2009

Happy Halloween Bear


How cute is this little guy?! I wanted to make a card of the bear only but when I ran the card stock through the Big Shot, I realized that he's just a little too small to be considered a "full card". I didn't want to abandon my idea so I got the bright idea to put a base layer down and adhere my "bear card" to it. Since you wouldn't be able to open the card if it were a full 5 1/2 x 4 1/4 (because of the pumpkin top), I cut the card stock down to 4 1/2 x 4. I stamped "Happy Halloween" on the inside of the card (the bear's belly).

When I showed this to Gary, he went "ga-ga" over it and really bragged about how cute it was.....the things that makes this man happy! lol! What do you think? I would love to "hear" your comments about it!

{Supplies}
Stamps: Teeny Tiny Wishes
Card stock: Creamy Caramel, Chocolate Chip, Pumpkin Orange, Summer Sun, Ballet Blue, Certainly Celery
Accessories: Big Shot, 1 3/4" circle punch, Build-A-Bear Bigz Bear die, Build-A-Bear Originals Kooky Spooky die

Friday, April 24, 2009

So excited!

I got a phone call from our neighbor telling me that her older daughter is engaged! I'm SO excited for Kehley and CJ! They are such a wonderful couple....sooo nice and just exactly what you would want in your own kids! I had to know how he proposed....OMG - he just stole my heart again (our family just loves CJ and Kehley!)!

He hid in Kehley's apartment - she came home from class early (she's attending UGA) and he almost got caught! He asked her if she had made her bed that morning. She went in to check and found a rose & a note. The note told her to go to a friend's apartment....where he had a rose & note waiting to give her. That note told her to go to another friend's apartment....where she had a rose & note waiting to give her. That note told her to go to the balcony....where she found another rose & note. That note told her to look down....where CJ was standing with a rose. She ran down to him and he proposed! How sweet is that?!!

I made the card below using UGA's colors since I have no idea what colors they will use (they're thinking next year) and I don't know what Kehley's favorite colors are. I used the Manhattan Flower Embossing Folder and cut out the dress. I saw this idea on a blog one day and knew I had to try it for myself! I really like how it turned out! What do you think?


Saturday, April 18, 2009

More Bunny Treat Boxes

I made one of these boxes for my last month's Gift Exchange partner and decided I "needed" to make more. I made these two for a couple ladies that came to my last Stamp-A-Stack. Are these not just the cutest little boxes you've seen? I think I'll have to try to come up with something for Mother's Day....maybe a flower? What do you think...any ideas to replace the bunny with? Let me know and I'll post it if I can create it! :o)


Friday, April 17, 2009

10 Year Friendship Swap cards

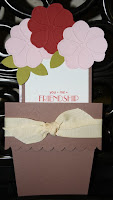
I belong to a wonderful Yahoo! Group that is celebrating its 10 year anniversary. One of the members decided to host a "Friendship Swap" and I participated. I knew what I wanted to do from the beginning....Flower pot cards with a packet of flower seeds. The "rules" were to create cards to swap and include a little written note about yourself so that you can get to know the other participants a little better. I put the packet of seeds and the note about myself behind the flower card. These were so easy to make...no adhesive for the flower pot (I did put a mini glue dot on the back of the ribbon just to hold it still) and little adhesive on the flowers! :o)

These are my completed flower pots.

Here is an up close view of one of the cards.


The card comes out to show the sentiment and your note.

The card pulled all the way out.

The flowers are created with the Simple Flower Embosslit.

Thursday, April 16, 2009

My Easter Goodies

I wanted to make up some goodies for Easter this year....I don't know why, I just did. ;o) We go to my parent's house for Easter lunch and egg hunting every year and even though our kids are older, they look forward to hunting eggs. I wanted to make a very simple treat for my parents (the last 2 pictures) with some of my mom's favorite and then I just kept going with the other treats....I had a ball creating these!

Let me know what you think about them..

This is the basket that I put all the treats in...it looked so cute (if I do say so myself-LOL!).
I used the Scallop Circle, small star, 1/4" circle and Boho Flowers punches to make the little chick and the Top Note Big Shot Die to make the bag topper. I stamped a flower from Fifth Avenue Floral stamp set to create the background. Can it really get any easier than this? I think not!


How would you like to see these sweet butterflies flying around your yard? These were created with Stampin' Up!s exclusive Beautiful Butterflies Bigz Die. I made a ton of these knowing that they would be one of the favorites...and they were! My mom took what was left over to the kids on her school bus the following day and she said they really liked them.
After I cut out the butterflies, I decided the wings needed some texture. I
used my exclusive Stampin' Up! Backgrounds I Texturz plates to give the wings that texture. I think they turned out pretty cute.
This box holds 12 Hershey's Nuggets! It's another Big Shot Die...Box #2. With the Big Shot dies, creating these treat boxes are a snap!
Yet another Stampin' Up! exclusive die for the Big Shot! This is created using the Stampin' Up! Baskets & Blooms Bigz XL die. I thought this made a cute little "Easter Basket" so I added some grass (under the treats).
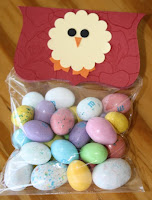
You guessed it...another die! The Top Note Bigz die was used here. Talk about easy! Just cut out 2 of the Top Notes and adhere a small paper bag (cut down to about 3" tall) to the insides of both. Open bag, fill with treats and ta da...you've got an EASY treat holder! Can you imagine all the possibilities with this one?!

These are the treats I put inside the treat holder above.
You can make bag toppers with the Top Note Bigz die as well! All you have to do is fold your card stock in half and put the folded edge right below the "cut line" on the die. You'll have a perfectly cut bag topper that's folded at the top. You can also do this to create your cards...just adhere it to a 5 1/2" x 4 1/4" piece of card stock and you've got your card.

This is Stampin' Up!s exclusive Matchbox Bigz XL die from the Occasions mini catalog. I can't tell you how E-A-S-Y this box is to make! The box has NO adhesive at all and the cover only needs it on one end!
I put some mini-Snickers and M&Ms in one and little chocolate bunnies in the other. I wanted to keep these really simple so I didn't add any embellishments to them....and they went over pretty darn well. Just think what would have happened if I had actually added some type of embellishment! ;o)
Yes, this is yet another Big Shot Die! I used the Scallop Circle to create these bag toppers. For the bunnies, I used the 1 3/8" circle, 1 1/4" circle, 1/2" circle and small oval punches. These were so easy to do that I was a little sad I ran out of candy!
My mom loves black jelly beans....and those creme things (I have no idea what they're called)! They're kind of like Jr. Mints but the inside is not peppermint-flavored. I don't like them but Mama does so I try to make her something using them whenever I see them. I used a "Frappacino" bottle to hold the candies. I knew that these shouldn't be really decorated so I kept them very simple!

The simple decorations for these bottles was a cute bunny on each (created with the punches mentioned above & a cotton ball) as well as the Simple Flower Embosslit Die (they're on the lid).
I loved the way they turned out and couldn't wait to hear how much my parents liked opening up their little bunny jars to get a treat! That's not what happened! I got a phone call from Mama a couple days later...She asked how I got the treats into the jar! WHAT?! Are you kidding me? It's a twist-off lid! I thought she had lost her mind and couldn't believe she was asking me how to open the jar! I told her to twist off the lid and she said they tried that....and they tried using a bottle opener but they wouldn't budge! I couldn't believe the lids wouldn't come off and she said that every time she walked into the kitchen she would see the black jellybeans and wanted one even more and couldn't get into them...it was driving them crazy! You'll be happy to know that my dad got them open.....he used his vice grips! Oh my word!! I can't tell you how hard I laughed whelm Mama told me this...and I can't tell you how shocked I am that it took that to open them! LOL!!

Saturday, April 11, 2009

Haley's Birthday Card

April 10th was our niece, Haley's 13th birthday and I decided she needed an extra cake! This is the new Sizzix Pop-Up Die (the Cake 3 Tier Die). You do need to have some type of closure for the card because the cake makes it pretty bulky but I didn't add it to Haley's card. I thought these colors worked well for a 13 year old...how bout you?


This is the outside of her card. I used the Scallop Oval punch that is in the Occasions mini catalog to punch the purple oval and the large oval punch to punch out the birthday greeting.
This in the cake on the inside of the card. Isn't it cute?


Gift Exchange Goodies

Each month on a Yahoo! Group that I belong to, we have a Gift Exchange. I am the Moderator of this program and I really look forward to it! I get to pair two members together for the month and they e-mail, chat, IM, etc. to get to know each other and then they send a "goodie" package to each other at the end of the month. Last month, I got a late start to getting my package together because of my little "4-day luxury hospital stay". LOL! I got myself together after I got home and sent my package late (communicating with my GE partner the whole time of course!). I had a BLAST putting this package together and thought I would share what she received....

The whole package (almost)
I bought this frame at the Dollar Tree...simple.
I added the flowers in the corners as well as the words between the hearts and "dressed it up".
How easy it was with the rub-ons that I used....how cute is that?!
This is a drink "topper".
You put it over the top of a water bottle (through the hole) and it holds your drink mix.
The top picture shows the drink mix & sent and the bottom picture shows
how I "popped up" the flower.
This is an "Embosslet Holder" that I made for the Stampin' Up! gift I sent.
I used the Big Shot to cut out the scallop envelope....SO easy it should be illegal! LOL!
I had to laugh after I sealed Shaline's package and opened my package from her
(I refused to open it until I had finished my package to her!)....
She sent me the exact same Embosslet!
What's that saying...."Great minds think alike" ;o)
This is a "to do" note pad that I covered and added a ribbon to keep it closed.
I got this and 2 items that are not in the picture from Michaels.
The other items were a tin that I filled with ribbon
and a magnetic notepad with an "S" on the front.
The colors were what I chose to use when I covered the notepad above.
I got this idea from a Demo friend of mine....how cute is this?!!
The paper bag is from Michaels (they're small).
The front and back is cut using the Big Shot Top Note Die!
Decorate, embellish, adhere the bag to the front & back and you're done!
Fill the bag with candy treats and you've got an E-A-S-Y goodie bag!!!
How in the world can you send someone a goodie package near Easter & not send a bunny?!
This little guy is created using ONE Top Note Die and a 4.5"x6" sheet of card stock!
Amy Celona is the Demonstrator that created this little guy and I followed her instructions.
You can find them here.
She has other tutorials as well so be sure to check them out.
You can see the Hershey's Nuggets that I added to the inside of the box in this picture.
The perfect little treat...a cute little critter and chocolate!