Tuesday, April 28, 2009

Happy Birthday Becky!

This past Friday was my friend Becky's birthday (I'll keep her age to myself!). I wanted to take her out to dinner to celebrate and tonight was the day that worked best for her so she came over after school (she's a Para-Pro at a nearby middle school) and we chatted for a bit then headed out to visit TJ Maxx to see if we could find a lamp for her and then to dinner at Chili's followed by Chick-Fil-A for dessert! I can't tell you how GREAT tonight was! I loved getting caught up with Becky and making plans for next week. We've both got some milestone events coming up that we'll be working on.....Brittany's graduation and 18th birthday for me - her son & her mom's weddings for Becky. It's going to be a busy few weeks coming up!

I know that Becky needs some pampering so I made a very simple gift bag to hold the bath gel, body scrub and lotion I got her and a faux alligator skin purse to hold the bath beads. Does the card look familiar? ;o) After I made the card that you can find in the post below this one, I thought, "That card screams BECKY! I need to make one for her!" so I did! LOL! I didn't want to post these projects until after I had given them to her....just in case she visited. I would hate for her to see her gift before she got it so I waited until after we visited tonight. ;o)

Faux Alligator Skin purse, bag & card...notice how the colors coordinate...
AND they're same colors that Jaron challenged us to use?

Sorry for the glare...I had to take a very quick picture & I had already put it in an envelope.

Faux Alligator skin purse

Close-up of purse. How stinkin' cute is this?!

Bag holding bath accessories.
I wanted to keep this VERY simple so I just covered a small paper bag
with some DSP and punched the "handle" with the large oval punch....easy peasy!
What do you think? I would love to hear what you think of Becky's gifts. ;o)

Friday, April 24, 2009

Jaron's Color Combination Challenge #1

One of my very favorite Stampin' Up! employees is Jaron Winder....I should rephrase that to "former Stampin' Up! employees". He is no longer with Stampin' Up! but he's still one of my very favorite people! I would "stalk" him at each Stampin' Up! event I attended, have my picture taken with him and chat a little bit about his family. He has the most adorable little "chickens" (that's what he calls his kids) and his wife is just beautiful! He has a personality that's as big as Utah (they live there) and a heart to match! I was sad to hear that he was no longer with Stampin' Up! but happy that I get to keep track of him through his blog.

When I checked his blog this morning, I saw that he decided to start posting a Color Combination Challenge. Since it's Jaron I couldn't not do it! I mean how bad would it be for me to say that this man creates some amazing work and then not trust his judgement by not participating in his challenge? Just because his first color combination is Old Olive, Taken with Teal and Soft Sky (a retired In-Color, color) doesn't mean he's lost his mind or anything....or at least I hope he hasn't.

After I finished some projects that I had to finish today, I decided to pull out Jaron's colors and see what I could come up with....Holy Smokes - they look GREAT together! I don't think the scan of my card does it justice! Using the stamp set Bird on a Branch, I first stamped the peacock (I don't know if that's what it really is but it's what I'm saying it is!) in Taken with Teal, then I stamped it in Soft Sky and did the "rock-n-roll" technique to outline it in Taken with Teal on a separate piece of Whisper White card stock and cut it out. The sentiment is stamped in Taken with Teal and the tree limb is stamped in Chocolate Chip. I first inked up the blossoms with Soft Sky and then removed the ink off some of the blossoms and colored them in using my Old Olive marker. I "popped-up" the peacock with dimensionals after I did all the stamping. Because I wanted everything to line up in specific places, I used my handy-dandy Stamp-a-ma-jig. There is no way I would have been able to get everything lined up the way I wanted it if I hadn't!

So, tell me what you think. Do you like these colors together? Why don't you give it a try and leave a comment to tell me what you think. Better yet, send me a picture of your creation and I'll post it here and put a link to it on Jaron's blog as well (if you're okay with that). I would love to see what you come up with!

Admin. Assistant's Day

I wanted to make a small gift for Gary to take to the two Admin. Assistants that he works with. I used the Fifth Avenue Floral stamp set to make the cards and some DSP to wrap around the bottle of air freshener. I also used the butterfly die to make the butterflies on the bottle. I didn't want to go "overboard" with the gift so I put some "smell good" bath items in the basket along with the reed diffuser air freshener. Gary was pleased with the gifts (although he forgot I was making a gift and was only expecting a card....again with the "man" thing!!!). He said the ladies LOVED their gifts and were pleasantly surprised! I'm a happy stamper! :oD


Close-up view of the basket contents.

View of the two baskets for Gary's Admin. Assistants.

Melissa's 23rd

I sat down to make my older step-daughter a birthday card and knew that I wanted it to be simple and pretty. I had just made Kehley's engagement card (see previous post) and loved the way the Manhattan Flower Embossing Folder worked with the vellum and I decided to do it with Melissa's birthday card.

I embossed the vellum and cut it down to 5 1/4" x 4". I stamped "Happy Birthday" on the same size Whisper White card stock and then adhered the vellum to the card stock using mini glue dots on the two upper corners (you couldn't see them through the vellum either!). After I did that, I wanted just a tad bit of color so I gently went over the raised edges of the vellum with my pastels and a sponge dauber. It doesn't really show up, but I used blue to give the rose some color...I didn't want a lot so I barely did it.


I wanted something more than the sentiment on the inside of her card so I stamped the big rose on the inside bottom corner. I *really* liked the way this card turned out!


Now that you saw the card that I created especially for Melissa....this is the card she'll get in the mail! Why? Because when I gave Gary the card to sign I didn't specifically say, "This is Melissa's card." and he signed "Gary" instead of "Love, Dad". I didn't because I told him earlier that I was making cards to get into the mail along with Melissa's birthday card that we would send her and another that we'll give her when we take her to dinner Sunday night.....I thought he would remember that his daughter was the only birthday card I would be making. Yeah, I know what you're thinking...."Are you kidding?! He's a man! Men don't remember things like that!" Oy! It was late last night and I was not going to make another card to get in the mail this morning so I went to my box of cards and grabbed this one. I'll most likely re-make the one above to give her Sunday night because I liked it so much but this is the one she'll be getting in the mail. :o( Oh well, at least she'll be getting one!


So excited!

I got a phone call from our neighbor telling me that her older daughter is engaged! I'm SO excited for Kehley and CJ! They are such a wonderful couple....sooo nice and just exactly what you would want in your own kids! I had to know how he proposed....OMG - he just stole my heart again (our family just loves CJ and Kehley!)!

He hid in Kehley's apartment - she came home from class early (she's attending UGA) and he almost got caught! He asked her if she had made her bed that morning. She went in to check and found a rose & a note. The note told her to go to a friend's apartment....where he had a rose & note waiting to give her. That note told her to go to another friend's apartment....where she had a rose & note waiting to give her. That note told her to go to the balcony....where she found another rose & note. That note told her to look down....where CJ was standing with a rose. She ran down to him and he proposed! How sweet is that?!!

I made the card below using UGA's colors since I have no idea what colors they will use (they're thinking next year) and I don't know what Kehley's favorite colors are. I used the Manhattan Flower Embossing Folder and cut out the dress. I saw this idea on a blog one day and knew I had to try it for myself! I really like how it turned out! What do you think?


Monday, April 20, 2009

Happy "Sweet 16" Kimberly!

Yesterday was our youngest daughter's 16th birthday and I really wanted to make a special pop-up 3-tier cake card for her! I knew I wanted to use chocolate and pink and this is what I came up with. I really like the way this one turned out...hope you do to! Let me know what you think of it. :o)


16 candles just for Kimberly


1st Birthday Invites

My Trainer's girlfriend asked if I could make some birthday invitations for her little girl's 1st birthday in June. These are the samples that I made up for her to choose from. Which one do you think she chose? I'll post the one she chose in a few days....she had a question about changing some colors so I did that & sent it to her to see how she liked it. :o)


Get Connected Promotion

Just a reminder that until April 30th, spend $40 on Occasions Mini Catalog products and choose any one item from the "Under $10" page in the Spring-Summer 2009 Idea Book & Catalog for free. There is no limit to the number of free "Under $10" products you can earn and you can purchase stamps and/or accessories to reach the $40 minimum.

Hold a workshop of $150 or more and choose any one item from the "Under $10" page in the Spring-Summer 2009 Idea Book & Catalog for free. For every $150 spent at the workshop, the hostess will receive another "Under $10" item. If you host a $300 workshop, you get to choose two "Under $10" items!

For more information, click here.

Saturday, April 18, 2009

More Bunny Treat Boxes

I made one of these boxes for my last month's Gift Exchange partner and decided I "needed" to make more. I made these two for a couple ladies that came to my last Stamp-A-Stack. Are these not just the cutest little boxes you've seen? I think I'll have to try to come up with something for Mother's Day....maybe a flower? What do you think...any ideas to replace the bunny with? Let me know and I'll post it if I can create it! :o)


Friday, April 17, 2009

10 Year Friendship Swap cards

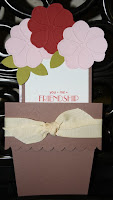
I belong to a wonderful Yahoo! Group that is celebrating its 10 year anniversary. One of the members decided to host a "Friendship Swap" and I participated. I knew what I wanted to do from the beginning....Flower pot cards with a packet of flower seeds. The "rules" were to create cards to swap and include a little written note about yourself so that you can get to know the other participants a little better. I put the packet of seeds and the note about myself behind the flower card. These were so easy to make...no adhesive for the flower pot (I did put a mini glue dot on the back of the ribbon just to hold it still) and little adhesive on the flowers! :o)

These are my completed flower pots.

Here is an up close view of one of the cards.


The card comes out to show the sentiment and your note.

The card pulled all the way out.

The flowers are created with the Simple Flower Embosslit.

Thursday, April 16, 2009

My Easter Goodies

I wanted to make up some goodies for Easter this year....I don't know why, I just did. ;o) We go to my parent's house for Easter lunch and egg hunting every year and even though our kids are older, they look forward to hunting eggs. I wanted to make a very simple treat for my parents (the last 2 pictures) with some of my mom's favorite and then I just kept going with the other treats....I had a ball creating these!

Let me know what you think about them..

This is the basket that I put all the treats in...it looked so cute (if I do say so myself-LOL!).
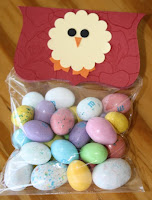
I used the Scallop Circle, small star, 1/4" circle and Boho Flowers punches to make the little chick and the Top Note Big Shot Die to make the bag topper. I stamped a flower from Fifth Avenue Floral stamp set to create the background. Can it really get any easier than this? I think not!


How would you like to see these sweet butterflies flying around your yard? These were created with Stampin' Up!s exclusive Beautiful Butterflies Bigz Die. I made a ton of these knowing that they would be one of the favorites...and they were! My mom took what was left over to the kids on her school bus the following day and she said they really liked them.
After I cut out the butterflies, I decided the wings needed some texture. I
used my exclusive Stampin' Up! Backgrounds I Texturz plates to give the wings that texture. I think they turned out pretty cute.
This box holds 12 Hershey's Nuggets! It's another Big Shot Die...Box #2. With the Big Shot dies, creating these treat boxes are a snap!
Yet another Stampin' Up! exclusive die for the Big Shot! This is created using the Stampin' Up! Baskets & Blooms Bigz XL die. I thought this made a cute little "Easter Basket" so I added some grass (under the treats).
You guessed it...another die! The Top Note Bigz die was used here. Talk about easy! Just cut out 2 of the Top Notes and adhere a small paper bag (cut down to about 3" tall) to the insides of both. Open bag, fill with treats and ta da...you've got an EASY treat holder! Can you imagine all the possibilities with this one?!

These are the treats I put inside the treat holder above.
You can make bag toppers with the Top Note Bigz die as well! All you have to do is fold your card stock in half and put the folded edge right below the "cut line" on the die. You'll have a perfectly cut bag topper that's folded at the top. You can also do this to create your cards...just adhere it to a 5 1/2" x 4 1/4" piece of card stock and you've got your card.

This is Stampin' Up!s exclusive Matchbox Bigz XL die from the Occasions mini catalog. I can't tell you how E-A-S-Y this box is to make! The box has NO adhesive at all and the cover only needs it on one end!
I put some mini-Snickers and M&Ms in one and little chocolate bunnies in the other. I wanted to keep these really simple so I didn't add any embellishments to them....and they went over pretty darn well. Just think what would have happened if I had actually added some type of embellishment! ;o)
Yes, this is yet another Big Shot Die! I used the Scallop Circle to create these bag toppers. For the bunnies, I used the 1 3/8" circle, 1 1/4" circle, 1/2" circle and small oval punches. These were so easy to do that I was a little sad I ran out of candy!
My mom loves black jelly beans....and those creme things (I have no idea what they're called)! They're kind of like Jr. Mints but the inside is not peppermint-flavored. I don't like them but Mama does so I try to make her something using them whenever I see them. I used a "Frappacino" bottle to hold the candies. I knew that these shouldn't be really decorated so I kept them very simple!

The simple decorations for these bottles was a cute bunny on each (created with the punches mentioned above & a cotton ball) as well as the Simple Flower Embosslit Die (they're on the lid).
I loved the way they turned out and couldn't wait to hear how much my parents liked opening up their little bunny jars to get a treat! That's not what happened! I got a phone call from Mama a couple days later...She asked how I got the treats into the jar! WHAT?! Are you kidding me? It's a twist-off lid! I thought she had lost her mind and couldn't believe she was asking me how to open the jar! I told her to twist off the lid and she said they tried that....and they tried using a bottle opener but they wouldn't budge! I couldn't believe the lids wouldn't come off and she said that every time she walked into the kitchen she would see the black jellybeans and wanted one even more and couldn't get into them...it was driving them crazy! You'll be happy to know that my dad got them open.....he used his vice grips! Oh my word!! I can't tell you how hard I laughed whelm Mama told me this...and I can't tell you how shocked I am that it took that to open them! LOL!!